SteelBoss
Active member
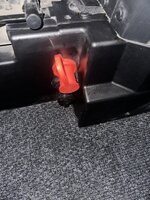
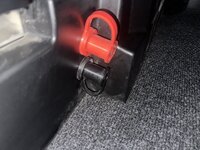
I really like the location of the jack. Is one of the 3 wires from tail light hot all the time without the brake pushed or just on when you turn the lights on
Follow along with the video below to see how to install our site as a web app on your home screen.
Note: This feature may not be available in some browsers.
Honestly, I don't remember but I think so. I'm super busy to check but you could call Dave at RLB Light Bar ((530) 888-9600) and he could tell you for sure.I really like the location of the jack. Is one of the 3 wires from tail light hot all the time without the brake pushed or just on when you turn the lights on
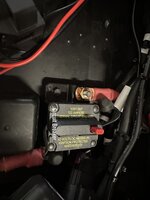
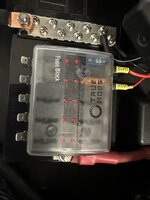
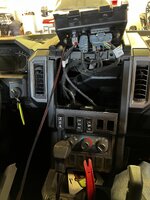
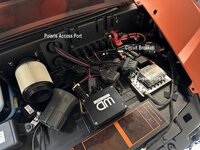
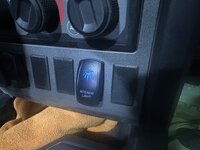
Where did you route the wires to?One of the drawbacks of the Xpedition cockpit is the lack of storage space. In other side by sides, you can install door bags to get that storage space. Time will tell on how we get it in an Xpedition. So, Polaris came out with their RAM Mount for the Phone. I had it install as they said to, but I had a backing plate added to strengthen the mount. I'll eventually install the SDR Motorsports mount that they displayed at the Sand Show when it produced. In addition, I had a triple USB device (1 standard USB and 2 C ports) and a 12-volt socket installed to power the phones and the GPS. I put those Items on a switch so I could have power when the vehicle is shut down. Since both those devices came with in-line fuses, I had a fuse block and a 100amp Thermal Circuit Breaker installed. Nothing worse than something going wrong, and it's raining, and you have to find that damn fuse. No more, just look under the hood.
Nice build. Did you install a seat belt bypass connector, if so where is it?One of the drawbacks of the Xpedition cockpit is the lack of storage space. In other side by sides, you can install door bags to get that storage space. Time will tell on how we get it in an Xpedition. So, Polaris came out with their RAM Mount for the Phone. I had it install as they said to, but I had a backing plate added to strengthen the mount. I'll eventually install the SDR Motorsports mount that they displayed at the Sand Show when it produced. In addition, I had a triple USB device (1 standard USB and 2 C ports) and a 12-volt socket installed to power the phones and the GPS. I put those Items on a switch so I could have power when the vehicle is shut down. Since both those devices came with in-line fuses, I had a fuse block and a 100amp Thermal Circuit Breaker installed. Nothing worse than something going wrong, and it's raining, and you have to find that damn fuse. No more, just look under the hood.
The wires were run from the back of the 2 devices (12v plug-in and USB plug), to an on/off switch on the bottom row of the vehicle panel, then through the firewall at the vacant hole Polaris provided to run wires (Polaris Access Port), to a fuse block protected by a circuit breaker.Where did you route the wires
I do not have any pictures of the bypass connector area, which I'll add later, but yes, I did add the seat belt bypass connector and it's a 5-minute job. Remove the driver's seat 1st, then remove the battery box cover. Look for the seatbelt wiring that runs down from the seatbelt attachment point closest to the center console to under the console. You should be looking at the wiring through the opening of the battery box. You will see a connector. That is where you install the bypass connector.Nice build. Did you install a seat belt bypass connector, if so where is it?
Thanks for the help. Did you install the Gilman clutch kit and how well does it work cutting down the noise and have you installed sound deadening material behind the head liner?Nice build. Did you install a seat belt bypass connector, if so where is it?
No on all your questions. These clutch kits all affect the Xpeditions performance. The Xpedition is a heavy vehicle and needs the lower gearing to perform the way Polaris wants them too. I think you'll see more burned belts if you install any of the clutch kits IMHO! Reference the sound, I wear headsets to talk to my passenger and to communicate via radio to our off-road group. I did install carpet from Car'l out of Idaho which helps some but the sound has never been an issue with me.Thanks for the help. Did you install the Gilman clutch kit and how well does it work cutting down the noise and have you installed sound deadening material behind the head liner?
Not sure if you or anyone else here is disappointed in the rear flares not being extended long enough? My rear taillights and bedsides keep getting covered in mud in that last bit of uncovered territory. I actually bought some textured plastic and made my own extensions to cure this problem. A good carpenter knife, square, 10 push pins, drill and torch later.....I came up with the fix. The gap takes a little getting used to but trying to find a way to connect it to the back of the factory flares was going to be tough.Now I added the Full Coverage Fender Flares by Polaris. Here is the link. Full Coverage Fender Flares | Polaris XPEDITION The kit fits both the 2 seat and the 5 seat ADV. I did the install in about an hour. All the parts to include the push pins come in the kit. Super easy to install. The only area you need to watch is the rear installation. It is a 2 part install and you have to watch that the gap between the 2 pieces is as small as possible. You'll see what I mean when you place the 2 parts up to the vehicle before you do any drilling. I'd recommend everyone add this accessory especially if you go with bigger tires. Otherwise, you have a better chance of slinging a rock into a window or your windshield.
installed this type of handle and after 90 days, it's still working wellSo, I've slowly but surely been adding accessories to our Polaris Xpedition ADV 5 NorthStar. At least what the wallet will bare right now. So far, all the accessories have come with easy-to-understand instructions. If it's a Polaris accessory, you'll have to download and print the instructions at your choosing. I'm going to post each of my accessories with pictures and links to where I got the accessory. Sorry for some of the terrible pictures. Feel free to chime in and post some of your accessories. If you have a better idea, Great!! It helps everyone. So, I'll start with the Rear Window Handle. Polaris considers the locking devices on the windows a handle also. They are hard to grab in bad weather or if you have small hands. My solution was this stick-on handle from Amazon. Amazon product ASIN B09TTKJXMV There are 1000's of handles so choose whatever you like.
I like how your power sources were mounted. Did you build the plate to mount both of the charging devices Or did they come togethe? If so could you tell me where you purchased? thanks for your time.One of the drawbacks of the Xpedition cockpit is the lack of storage space. In other side by sides, you can install door bags to get that storage space. Time will tell on how we get it in an Xpedition. So, Polaris came out with their RAM Mount for the Phone. I had it install as they said to, but I had a backing plate added to strengthen the mount. I'll eventually install the SDR Motorsports mount that they displayed at the Sand Show when it produced. In addition, I had a triple USB device (1 standard USB and 2 C ports) and a 12-volt socket installed to power the phones and the GPS. I put those Items on a switch so I could have power when the vehicle is shut down. Since both those devices came with in-line fuses, I had a fuse block and a 100amp Thermal Circuit Breaker installed. Nothing worse than something going wrong, and it's raining, and you have to find that damn fuse. No more, just look under the hood.
Actually, I bought this: https://www.amazon.com/gp/product/B0BDK455B2/ref=ppx_yo_dt_b_asin_title_o05_s00?ie=UTF8&psc=1I like how your power sources were mounted. Did you build the plate to mount both of the charging devices Or did they come togethe? If so could you tell me where you purchased? thanks for your time.
Thank You! You definitely have your rig, all done up all the bells and whistlesActually, I bought this: https://www.amazon.com/gp/product/B0BDK455B2/ref=ppx_yo_dt_b_asin_title_o05_s00?ie=UTF8&psc=1
and this: https://www.amazon.com/gp/product/B09PDBWWDR/ref=ppx_yo_dt_b_asin_title_o05_s01?ie=UTF8&psc=1
and then swapped out parts to get the desired result I wanted.

Do you have pics of it installed on your xpedition?Just purchased these inner fire wall guards which they call inner fender guards. Quality is over the top. Plus, they are way cheaper than the other companies that sell the same product!
Polaris Xpedition Inner Fender Guards - AJK OffRoad
How is your handle holding up?So, I've slowly but surely been adding accessories to our Polaris Xpedition ADV 5 NorthStar. At least what the wallet will bare right now. So far, all the accessories have come with easy-to-understand instructions. If it's a Polaris accessory, you'll have to download and print the instructions at your choosing. I'm going to post each of my accessories with pictures and links to where I got the accessory. Sorry for some of the terrible pictures. Feel free to chime in and post some of your accessories. If you have a better idea, Great!! It helps everyone. So, I'll start with the Rear Window Handle. Polaris considers the locking devices on the windows a handle also. They are hard to grab in bad weather or if you have small hands. My solution was this stick-on handle from Amazon. Amazon product ASIN B09TTKJXMV There are 1000's of handles so choose whatever you like.
Fantastic. I was worried that it wouldn’t hold up, I’ll order one today. The latches that are factory are not good.PERFECT. No Issues.
Fyi, This model of handle has held up for me over a year now... no issues.How is your handle holding up?