Wiring Accessories to the Pulse Bar

JGKopp

New member
Jun 3, 2024
18
15
Lake Havasu City, Arizona
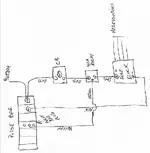
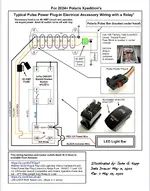
In case anyone else is interested, I did this drawing for a better understanding of the Pulse Bar and how to wire up accessories with a relay and back lit 5 wire rocker switch. A link to this pre-made wire harness from Amazon is listed along with a “white” back lit switch. You will note, the load draws power from the larger 40 AMP circuit and the 10 AMP “Keyed” circuit turns the back lit switch and accessory on or off.
John #PolarisXPEDITION
 

Attachments

  • Polaris PULSE Bar Xpedition Rev 2.pdf
    257.6 KB · Views: 86
John, how did you run wiring up to the light? No A pillar covers to hide behind, and trying to figure out how to get the leads from inside to outside on roof, or did you just run it all outside? TIA for any info!
Cris B
 
Hi Cris,
My light wiring consisted of a chase light however, I did route wire to a speaker I mounted to the rear view mirror.
I unmounted the passenger side of the front ceiling liner. Untucked the part behind the roll bar and you will find a factory wire loom routed inside the A pillar that comes out up there. Also take the passenger side mirror and inside plastic backing sections off. You will need a 12mm deep socket to get the gas strut ball mount removed for taking the inside plastic cover off. Now look at the attached pictures of this area.
I used a roll of 1/4” drip mist tubing to route from up top and down through the inside of the A pillar and it easily went till it bottomed out. I then carefully hooked onto it and pulled it out where the mirror was. You can use a metal coat hanger for this hook. Looped a pull string or in your case hook your wires to it for pulling it up the inside of the A pillar to the factory hole up top. The wires need to be routed already from the dash side it was just easier to work from the outside of the car in doing this.
WD Electronics has a methodical Xpedition installation video that will show you how to take the top dash panel off. I never took it completely off, you only need to lift it up slightly on the passenger side but be sure to release all of the hold down hardware. Make sure you have the plastic tools for pulling the push pins, they are cheap to buy. I will link a video I did after installing the street legal kit and I talk about taking apart the dash. It’s meant to provide some additional detail after watching the WD installation video and the pointers I added will help. I have a link on this video for the plastic tools. Hopefully all this is helpful.
 

Attachments

  • IMG_7251.jpeg
    IMG_7251.jpeg
    295.8 KB · Views: 32
  • IMG_7254.jpeg
    IMG_7254.jpeg
    295.6 KB · Views: 38
Last edited:
Thanks! Great write up, I will dig into video later but I think I have the idea!!! Very helpful, I’m sure others will appreciate it also.
 
Just finished adding signal lights to the PulseBar. Ran them up under the interior headliner which is much easer than under the buggy. Bought on Amazon for $69 for horn and turn signal kit. Yes it took some time, but came out great. Couldn't justify paying hundreds more for something not used much.
 

Attachments

  • Rear Sig lites.jpg
    Rear Sig lites.jpg
    219.2 KB · Views: 23
  • SigHorn kit.jpg
    SigHorn kit.jpg
    262.3 KB · Views: 24
  • Signal lite.jpg
    Signal lite.jpg
    317.2 KB · Views: 27
  • T switches.jpg
    T switches.jpg
    325.3 KB · Views: 18
Back
Top